
ProMFA App
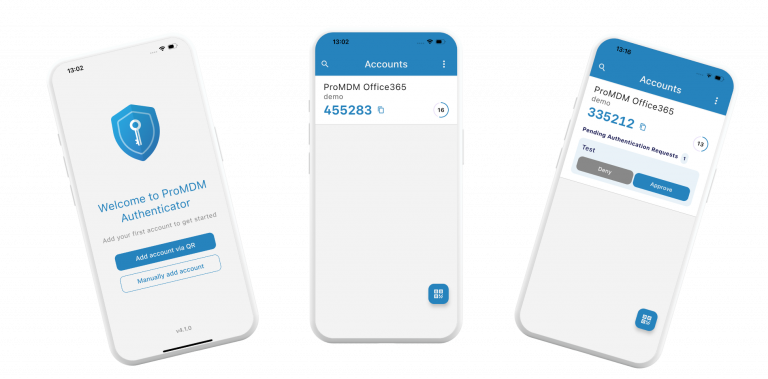
ProMFA is a multi-factor authentication (MFA) app designed to increase the security of online accounts.
By requiring not just a password but also a one-time code or approval, ProMFA ensures that only
authorized users can gain access.
This guide walks through each screen of the app, explaining how to use it effectively. — ProMFA (EN) —
1
Security Prompt – No Device Lock Detected
When the ProMFA app is opened and the device does not have any kind of screen lock (like a PIN, fingerprint,
or pattern) a security prompt will be shown.
Since ProMFA stores sensitive data used to verify identity, the app checks whether the device is secure. If no
system-level lock is detected, it offers alternative protection.
This prevents unauthorized access to the MFA codes. Without any lock on the phone or tablet, anyone who
gains physical access to the device could open the app and use the codes.
There are two options:

  • Set Screen Lock
    Opens the device’s settings so a screen lock can be enabled such as a
    PIN, fingerprint, or pattern. This is the most secure and
    recommended method, as it protects the entire device.
  • Set ProMFA PIN
    A PIN that will be required to open the ProMFA app can be created by
    selecting this option. This protects access to the authentication codes
    even if the device does not have any system lock in place.
    This extra layer of security helps ensure that the codes remain private, even
    if the device is lost, shared, or accessed by someone else.
    Note: If a ProMFA PIN is not required by your organization or policy, it can
    disable it at any time later by going to Settings > App Security and switching
    off the protection toggle. — ProMFA (EN) —
    2
    Set ProMFA PIN
    If Set ProMFA PIN is selected on the previous screen, it will be possible to create a personal 4-digit
    PIN that protects the app from unauthorized access.
    How to set up the PIN:
  1. Enter a 4-digit PIN.
  2. Confirm the PIN by entering it again to verify accuracy and avoid mistakes.
  3. (Optional) Tap the eye icon to toggle the visibility of the numbers while typing. This feature
    helps prevent input errors by allowing you to see what you’re entering.
    Once set, this PIN will be prompted then the app is launched, providing a layer of security. The PIN
    can be changed in the app’s Settings menu. — ProMFA (EN) —
    3
    Add an Account in ProMFA
    Ways to Add an Account
    There are two methods to add an account:
  4. Via QR Code:
    The service you want to secure usually provides a QR code – scan the QR code with the ProMFA app,
    and all required information will be added automatically.
  5. Manually:
    If the service does not offer a QR code, the account can be added manually by entering details such as
    the account name, secret key, and any optional settings provided by the service.
    Once added, ProMFA will start generating time-based one-time passwords (TOTPs) for that account, ready for
    use during your login process. ProMFA accounts can also receive push notification authentication requests. — ProMFA (EN) —
    4
    Account List & Authentication Requests
    This is the main screen where all active accounts and any pending authentication requests are shown.
    Key Features:
  • Add Account Button (bottom-right):
    Tap this button to quickly add a new account by scanning a QR code.
  • Account Entries:
    Each account displays the account name, UPN registered, a one-time password (OTP) and a visual
    timer that shows how much time remains before the current code expires.
  • Authentication Requests:
    When a service sends a push notification (such as a login attempt using your credentials), you’ll
    receive an instant prompt to Approve or Deny the request.
    Use this screen for fast and convenient access to authentication codes and to manage login approvals
    efficiently. — ProMFA (EN) —
    5
    Side / Overflow Menu
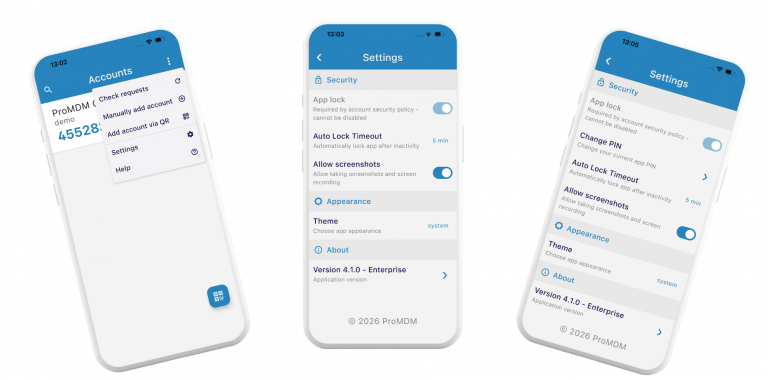
    The side or overflow menu gives you access to a list of features and
    configuration settings.
    Menu options include:
  • Check Requests
    Check if any pending requests sent by services using push-based
    authentication are waiting.
  • Add Account via QR
    Quickly open the camera scanner to add a new account by scanning a
    QR code.
  • Manually Add Account
    Enter account details manually when a QR code is not available.
  • Settings
    Manage all app configurations, including PIN setup and app theme.
    Use this menu to efficiently manage authentication accounts and customize
    the app’s behaviour to suit your needs. — ProMFA (EN) —
    6
    Settings
    After selecting Settings from the side menu, the screen where ProMFA app can be customised will be shown.
    Here key options can be adjusted to personalize the experience and keep the accounts secure.
    Main options include:
  • App Lock (toggle):
    When enabled, ProMFA will require entering a PIN whenever the
    app is opened (when the timer runs out).
  • Auto Lock Timeout (dropdown):
    Set a timer to ensure when the app will automatically lock when not
    used
  • Allow screenshots:
    When enable through configuration this toggle allows and disallows
    taking screenshots and screen recording – when disallowd the
    screenshots will not contain any data (by default screenshots are
    disallowed)
  • Notification Response (toggle – Android only):
    Enable this to approve or deny login requests directly from your
    device’s notification panel without needing to open the app
  • Theme (dropdown):
    Choose the colour theme of the app – the options are system, light
    and dark
  • About / App Version:
    Displays the current version of ProMFA installed on your device.
    Note:
    If a ProMFA PIN (App Lock) was set instead of using the device’s built-in lock (such as screen lock or biometric
    unlock), an additional option to Change ProMFA PIN will appear in the Settings menu. This allows the user to
    change the ProMFA PIN anytime. — ProMFA (EN) —
    7
    Change the ProMFA PIN
    If the ProMFA PIN (via App Lock) was already set and the user wants to update it, it can be done within the app
    settings:
  1. Navigate to Settings > Change PIN.
  2. Enter the current PIN for verification.
  3. Enter the new 4-digit PIN and confirm it by entering it again.
    Regularly updating the PIN helps keep the app access secure.
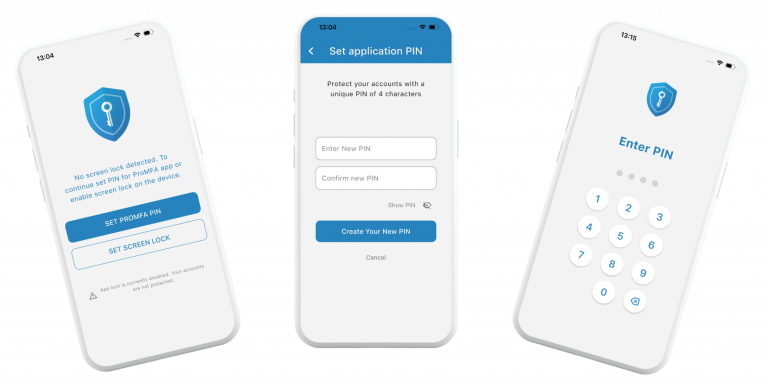
 — ProMFA (EN) —
    8